CLICK HERE FOR FREE BLOGGER TEMPLATES, LINK BUTTONS AND MORE! »

Wednesday, November 30, 2011

Project : 8 of : 23

I saw this next project on Pinterest and knew it was a "must make" DIY project for Christmas. It only took my about 20 minutes and less than $10 thanks to a couple Black Friday deals last week.

So without further adieu, Project : 8 of : 23 

For this project I used a small 8" x 8" shadow box, a piece of scrapbook paper and a scrap from another project, jingle bells and a decal I made.


First I opened the back of the shadow box and added the jingle bells.  


Next I glued the scrap paper to the 8" x 8" piece...

  
Then I just trimmed the overlapping piece of the scrap.


 Put the paper in the back of the shadow box and closed it back up...
 

...added the decal and VIOLA!
 

Project : 7 of : 23

I have been working on this project for some time now... I had to do it little by little when I had time. The sad thing is, in total, it only took about 30 minutes of my time from start to finish.  With my son growing SO quickly, I had to hurry up and get this one done!

So without further adieu, Project : 7 of : 23

I started with a raw piece of lumber from Home Depot and painted it white. (I took a photo of the wood before I painted it but accidentally deleted it AFTER I painted... can't go back and start over on this one.)

I brushed 2 coats of white paint with a white paint brush.  I wanted to the wood to look kind of aged, but not distressed.

I have NO idea why this photo keeps posting sideways... so just tilt your head while looking at it.

Next I designed the ruler markers on the computer and cut them as a decal.


I used a tape measure next to the wood as I applied the decal just to make sure I was staying on track, even though I designed the decal with exact measurements.  


...and viola!!! A giant ruler in my hallway.  I anchored a wall between the kiddos rooms.

As soon as I stepped back from it after putting it up on the wall, my 2 year old ran over and stood in front of it with her back against it.  How she knew what it was for was beyond me... and when my son woke up this morning and saw it, his first instinct was to measure himself too.   Gotta love it!

Tuesday, November 29, 2011

Project : 6 of : 23

Okay so at this point, I am now longer posting projects in order.  I have made a couple others that I just didn't finish taking photos of yet but do not want to stop the momentum of actually posting the projects so here is one I just completed AND took a couple photos of...

This one is my first of several winter holiday projects... 

So without further adieu, Project : 6 of : 23

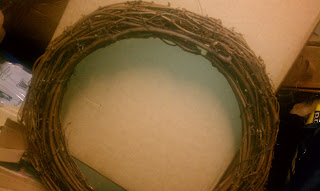
I took our wreath from last winter and took all of the stuff off of it.  It had pine cones, berries and other festive winter goodies.

Before (after removing all the stuff from it)


I started by spray painting the wreath white to give me a clean, pop of color to go on my now bright green door.


Then I just hot glued a bunch of random Christmas ornaments, bells, ribbon and picks I got from Michael's Black Friday sale and topped it off with a "JOY" sign I bought after Christmas last year from another craft store.


I don't know about you... but I like it!  

I can't believe one of the ladies who works at Michael's told me, "maybe you'd be better off buying one pre-made."


Wednesday, November 23, 2011

I had to do a Pinconciliation...


Monday, November 21, 2011

Love Pin Make

Sunday, November 13, 2011

Project : 5 of : 23

Another day, another project. Today I wrapped up yet another project  for my project of projects, Project :: 23

*giggle* I was trying to see how many times I could say project in one sentence... 4 is my current record! 

This is one I wanted to do for a little while now and finally was able to finish it with my husband's help... who hid the drill from me so I had no choice BUT to have his help. #love

My projects will all fall under one of 4 categories: (1) Decor (2) Organize / Clean (3) Recipe (4) Random.  This one covers both decor and organize. 

So without further adieu, Project : 5 of : 23
 
Empty aluminum cans
 

 ...spray painted black

Enter Hubby with the drill: 
 
 Add some twine and a hook (or 3) on the wall... and hang them!

I added 3 hooks and hung them in a row between my windows.

Viola... the final project!


Friday, November 11, 2011

Project : 4 of : 23

I am really knocking out projects with my project of projects, Project :: 23

Who would have thought that me posting this idea on my blog would keep me so motivated.  Maybe I should start posting all my to-do list type stuff on here.

Today I knocked out Project 4... although I have been working on it for several days here and there.  I am planning on turning a wall in one of my hallways into a mini museum with my children's artwork. My son is now 13 and I have a large storage container filled with his toddler - kindergarten artwork.  My 2 year daughter is also a little artist.

One thing I thought about adding to the museum wall was some information about them. I decided to make a "stat plaque" for each of them...
 
So without further adieu, Project : 4 of : 23


Saturday, November 5, 2011

Project : 3 of : 23

I'm on a roll with my project of projects, Project :: 23
Yesterday I knocked out Project 3... although I was 3 days late since I had it planned to have my project up hanging by November 1st.  
For November, being the month of "giving thanks" I wanted to incorporate it in multiple places around my home... started with the front door.
 
So without further adieu, Project : 3 of : 23
For this project I used my spring wreath and made a few tweeks.  

BEFORE: 

 (The faded area on the top is from the wreath hook)

AFTER:
 

I took off the red & blue silky flowers and replaced with with an orange flower and a red flower, that I painted brown.  I took a wooden plaque I had and painted it brown. Then topped it off with a "Give Thanks" vinyl decal I designed.


Simple yet effective!

Thursday, November 3, 2011

Project : 2 of : 23

I am steadily working on my project of projects, Project :: 23

This morning I completely Project 2 and it was super easy and even cheaper than easy! I saw this great project on the Choose to Thrive blog back in may and new I wanted to make my own this Autumn.  

So without further adieu, Project : 2 of : 23


The project only cost me a couple of dollars... and that was for the vinyl lettering I made. My neighbor was ever so kind to supply me with the brown bottles and the straw looking stuff was picked from a bush outside. I was going to use wheat but wanted to try this first... being that it was FREE

The niche it is sitting in is such a shallow shelf that I usually have trouble finding things to fit it.  I think this is just right for the season.